
Table of Contents
ToggleA cramped, disorganized pantry saps time and money. Homeowners lose track of inventory, duplicate purchases pile up, and forgotten staples expire in the back corners. But a small walk-in pantry has real potential, it just needs a smart layout and the right storage tactics. Whether you’re converting a closet, squeezing functionality into a galley kitchen corner, or renovating an undersized space, these 12 practical ideas will help you reclaim every inch. Most require basic tools, no permits, and a weekend or two of hands-on work. Let’s walk through the solutions that actually move the needle on small pantry organization.
Key Takeaways
- Small walk-in pantry ideas focus on maximizing vertical space with wall-mounted shelving from floor to ceiling, which can triple usable capacity compared to freestanding units.
- Clear, labeled containers stacked by category reduce food waste, prevent duplicate purchases, and cut shopping time by letting you see exactly what inventory you have.
- Install practical racking solutions in corners and on doors, add LED motion-sensor lighting, and keep frequently used items at waist-to-eye level for efficient daily access.
- Implement a FIFO (first in, first out) rotation system with purchase-date labels and seasonal audits to prevent expired items from piling up in back corners.
- Transform pantry organization in a weekend using basic tools like a drill, level, and stud finder—no permits required—by prioritizing vertical storage, containment, and accessibility.
Maximize Vertical Storage With Wall-Mounted Shelving
Vertical space is your best friend in a small pantry. Instead of relying on a single bottom shelf, take advantage of wall height from floor to ceiling. Wall-mounted shelving, whether fixed brackets with plywood spans or full systems with adjustable pegs, transforms dead space into functional real estate.
Start by selecting sturdy ½-inch or ¾-inch plywood shelves, depending on load. Heavy items like canned goods and bulk grains need proper support: undersized shelves will sag within months. Use heavy-duty L-brackets or floating shelf hangers rated for at least 50 pounds per shelf. For a DIY approach, drill pilot holes at least 16 inches apart into wall studs, hitting studs matters when you’re stacking weight. If you hit drywall between studs, install toggle bolts or heavy-duty anchors rated for your load.
Space shelves 12 to 14 inches apart vertically to accommodate the taller pantry staples (cereal boxes, mason jars, canned tomato sauce). Leave the top shelf higher if you rarely access it, reserve that for seasonal items or backup stock. A typical small pantry wall (4 feet wide) can easily fit 5 to 6 shelves running floor to near-ceiling, instantly tripling usable capacity compared to a single freestanding unit.
Organize With Clear Containers and Labeling Systems
Once your shelves are in place, containment is next. Loose items, flour, sugar, pasta, crackers, create visual chaos and take up irregular amounts of space. Airtight clear containers (glass or food-grade plastic) stack neatly, protect items from pests, and let you see at a glance when supplies run low.
Invest in a few standard sizes: tall rectangular containers for flour and sugar (5-quart capacity works well), square jars for baking supplies, and smaller 2-quart bins for spices and seasonings. Label the front clearly with a label maker or waterproof tape and permanent marker. Include the item name and the date you filled it, pasta doesn’t go bad, but knowing when you opened it helps catch staleness. Color-coded labels by category (grains, baking, snacks, canned goods) speed up the mental scan when cooking.
Research from organizing experts at Real Simple shows that transparent storage reduces food waste and cuts average shopping time by letting homeowners see exactly what they have. Stack containers in groups by dietary need: breakfast items together, baking supplies clustered, snacks in their own zone.
Install Efficient Shelving and Racking Solutions
Beyond basic wall shelves, targeted racking systems maximize tight corners and awkward depths. A small pantry often has 12 to 18 inches of depth, deeper than a typical shelf needs, but wasted if you stack everything in a single row.
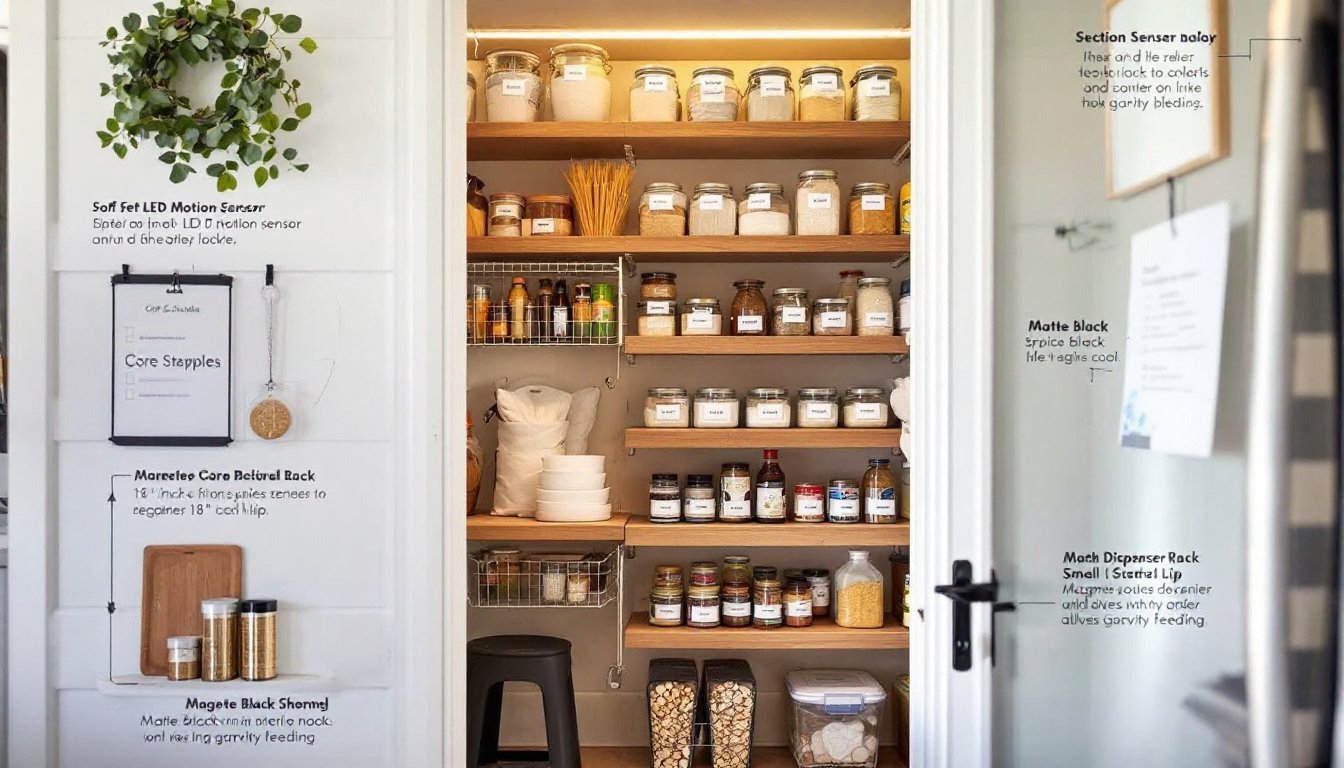
Corner Shelves and Angled Racks
Corner shelves capture otherwise dead space. A 90-degree corner shelf unit (16 to 24 inches per side) bolts into the corner studs and holds snacks, spices, or backup pantry staples without eating into traffic flow. Angled pull-down shelves or sliding baskets also work in corners, they swing out slightly and pull down to deliver items from the back forward, reducing the need to reach deep.
For canned goods, a can dispenser rack on one wall (or a simple angled shelf with a lip) lets items roll forward as you grab the front unit. This works like a grocery-store shelf: gravity feeds stock toward the edge, so older inventory naturally gets used first. Install it at eye height or slightly below, with a 2-inch lip to prevent rolls.
Door-mounted racking is popular too. Thin spice racks or narrow wire shelves mount inside the pantry door, holding small jars, bottles, and packets. Ensure the door still closes fully, pantry doors swing inward, so shelves shouldn’t protrude more than 4 inches. Wire shelves weigh less than wooden ones and allow air flow, which helps prevent moisture buildup around sealed containers.
Add Lighting and Accessibility Features
A dark pantry becomes a place where items vanish and go forgotten. Install proper lighting to see every shelf clearly. A simple battery-operated motion-sensor LED strip (12 to 24 inches long) mounts on the upper shelf or ceiling. No wiring needed, flip the adhesive backing, press it on, and it activates when the door opens. Cost runs $15 to $40, and it transforms usability immediately.
For a more permanent solution, install a low-voltage puck light kit (most run 12V) hardwired to a dimmer switch or standard outlet. Position the light near the center of the ceiling or toward the back wall, avoiding shadows from shelves above.
Accessibility matters too, especially in a narrow walk-in. Keep frequently used items at waist to eye level (a 6-foot-tall adult should reach without squatting). Reserve the floor for heavier bulk items, lower shelves for day-to-day staples, and upper shelves for backup stock or seasonal baking supplies. Install a small step stool inside the pantry (18 to 24 inches high) for safe access to top shelves. Narrow pantry doors sometimes make it tricky to maneuver a stool in and out, so some homeowners store it right inside, tucked beside the door frame. Install a magnetic hook or simple rail to keep it in place when the door’s closed.
Use the Door Space for Extra Storage
The inside of the pantry door is prime real estate. Most homeowners leave it empty, wasting a vertical surface that’s always at hand. Thin, lightweight items belong here: packets, spices, oils, vinegars, and small condiment jars.
Mounting options range from simple to sophisticated. Adhesive-backed spice racks (no drilling required) work on hollow-core doors but have weight limits, check the manufacturer’s rating, usually 5 to 10 pounds max. For solid wood doors or higher weight, use shallow wire shelves or narrow over-the-door racks bolted to the door frame. Drill pilot holes to avoid splitting: use ⅛-inch wood screws into a solid door, or toggle bolts if the door is hollow. The goal is keeping shelf depth to 3 to 4 inches so the door still closes smoothly.
Organize door storage by category: cooking oils on one shelf, vinegars and condiments on the next, baking extracts and food coloring together. Leave the very bottom section clear or use it for lightweight items, the door takes stress every time it swings, so overloading the lower shelves invites sagging and wear. Apply kitchen design solutions from The Kitchn recommendations to prioritize items you grab most often.
Implement a Rotation System for Pantry Items
Organization isn’t just storage, it’s discipline. A simple FIFO system (first in, first out) prevents waste and ensures older stock gets used before newer supplies.
When you stock the pantry, place new items behind old ones. Label everything with the purchase date using a waterproof label maker or masking tape and permanent marker. For perishables with expiration dates (baking powder, yeast, canned goods past their prime), do a seasonal audit, set a calendar reminder for the start of each season to purge expired items. Most home pantries accumulate surprises: a can of chickpeas from three years ago, baking soda that’s lost potency, oil that’s gone rancid.
Create a simple checklist posted inside the door listing your core staples: flour, sugar, salt, baking powder, yeast, canned tomatoes, beans, broth. When you use the last unit, mark it. This prevents duplication and ensures you always have backup stock for regular recipes. For families with kids or roommates, a shared inventory list, either printed or digital, prevents surprise shortages and reduces redundant shopping trips.
Carry out a “donation shelf” for items you realize you won’t use. Unopened, unexpired goods go here: periodically donate them to a local food bank. This keeps the pantry focused on what you actually eat and frees up space for smarter choices.
Practical Next Steps
Start by auditing what you have. Pull everything out, toss expired items, and consolidate duplicates. Measure your pantry, height, width, depth, and stud locations. Sketch a rough layout on paper, marking where shelves and racks will go.
Begin with wall shelving (it’s the highest-impact upgrade) and work toward lighting and door storage. Most DIYers can complete a full small-pantry overhaul in a weekend using basic tools: a drill, level, stud finder, and tape measure. Product choices vary by budget, but the principles, vertical storage, containment, labeling, accessibility, and rotation, work across every price point. A pantry that supports your cooking rhythm and shows you what you have doesn’t feel cramped. It feels purposeful.