
Table of Contents
ToggleWeatherford’s hot summers and mild winters create unique demands on your HVAC system. Unlike northern climates with dramatic seasonal swings, your unit runs more consistently throughout the year, which means it works harder and accumulates dust and debris faster. Homeowners who skip regular maintenance often face expensive breakdowns during peak cooling season or discover efficiency losses that spike energy bills. This guide walks you through the essential tasks you can handle yourself and the warning signs that call for a professional. With smart planning and basic upkeep, your HVAC system stays reliable and efficient all year long.
Key Takeaways
- Regular HVAC maintenance in Weatherford prevents costly breakdowns and extends system lifespan by 5–7 years compared to neglected units.
- Replace air filters every 1–2 months during hot months and clean outdoor condensers in spring and fall to combat Weatherford’s dust and heat.
- A clogged filter forces your system to work 10–15% harder; document inspections to catch efficiency losses and refrigerant leaks early.
- Professional HVAC maintenance is essential for refrigerant work, electrical diagnostics, and heat exchanger repairs—tasks that violate warranties if DIY attempted.
- Summer temperatures exceeding 95°F demand preventive maintenance; units skipping annual care typically need replacement 5–7 years earlier than well-maintained systems.
Why Regular HVAC Maintenance Matters in Weatherford’s Climate
Weatherford’s climate is deceptively demanding on HVAC systems. Summer temperatures routinely exceed 95°F, pushing air conditioning units into near-constant operation. Dust storms and the region’s dry air accelerate filter clogging and can reduce system efficiency by 15–20% if left unchecked. Winter months are gentler, but the temperature swings stress both heating and cooling components as the system cycles on and off more frequently.
A well-maintained system uses less energy, runs quieter, and lasts significantly longer. Units that skip annual maintenance typically need replacement 5–7 years earlier than those that receive routine care. Beyond longevity, regular upkeep catches small problems, a refrigerant leak, a cracked heat exchanger, worn fan belts, before they become $1,500 repairs. In Weatherford’s heat, a broken AC isn’t just uncomfortable: it’s a health risk for elderly family members and young children. Preventive maintenance is insurance against both cost and crisis.
Essential Spring And Fall Maintenance Tasks
Spring (March–April) and fall (September–October) are the ideal windows to prepare your HVAC for heavy use. Perform tasks before cooling season peaks in June and after summer heat breaks in mid-September. These intervals catch wear patterns before they cause failures and reset efficiency benchmarks for the upcoming season.
Checking And Replacing Air Filters
Your air filter is the first and easiest line of defense. Most homes use 1-inch thick filters rated at a MERV 8–13, which balances airflow and particle capture. Weatherford’s dust means you’ll likely replace filters every 1–2 months during hot months, compared to 3 months in milder climates.
Steps:
- Turn off your thermostat before removing the filter.
- Note the filter size printed on the frame (commonly 16×25×1, 20×25×1, or 16×20×1 inches).
- Check the arrow on the frame and ensure it points toward the furnace/air handler, not the return duct.
- Slide out the old filter and inspect it for dust buildup. If it’s gray or dark after just 4 weeks, you’re in a high-dust zone.
- Insert the new filter, double-checking the airflow arrow direction, and restore power.
Never skip this step. A clogged filter forces your system to work 10–15% harder, costing you money every day it’s installed. Keep spare filters on hand, buying a bulk pack saves money and ensures you never run with a dirty filter out of convenience.
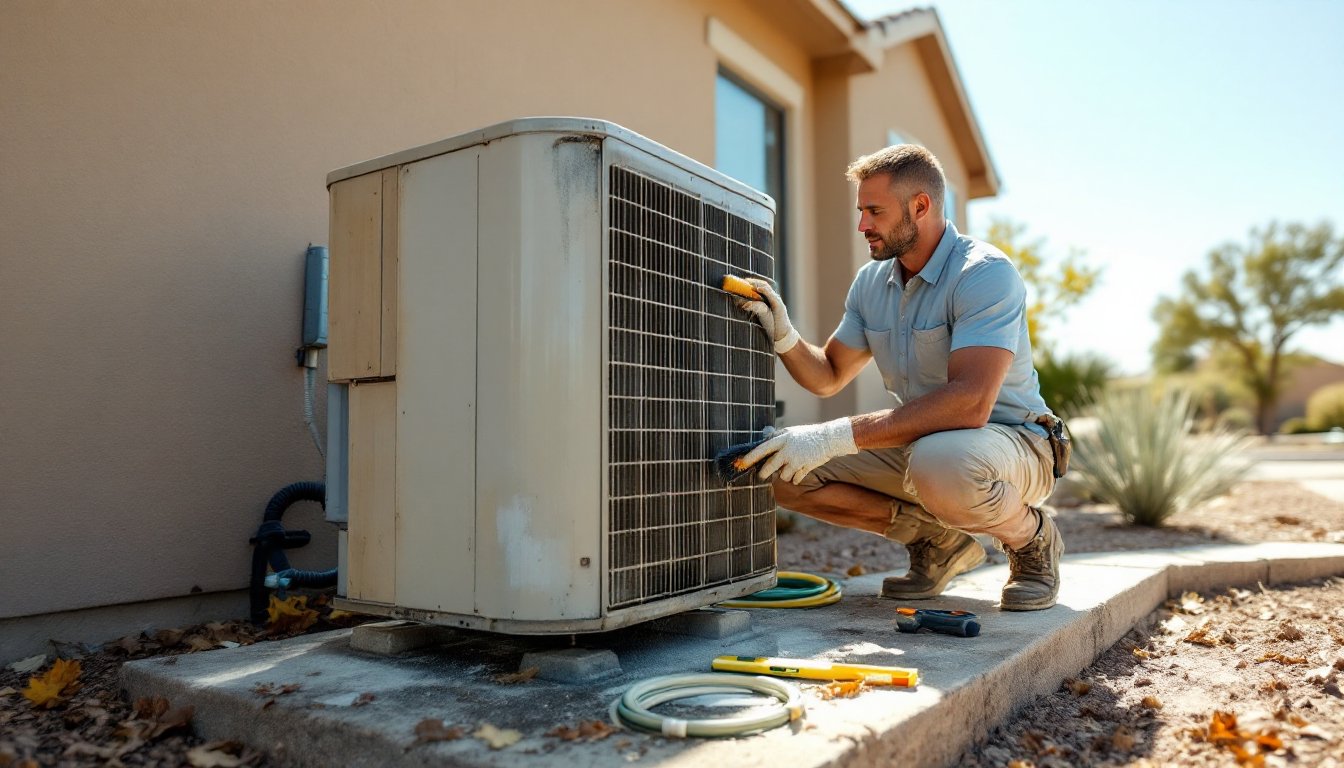
Cleaning Outdoor Units And Clearing Debris
Your outdoor condenser unit is exposed to sun, dust, and debris. Spring cleaning removes winter buildup: fall cleaning prevents leaves and twigs from clogging the unit during the season’s transition.
Materials and tools:
- Soft-bristle brush
- Garden hose
- Fin comb (optional, ~$15)
- Work gloves
- Safety glasses
Steps:
- Turn off power at the breaker. Do not skip this, live electrical components are inside the unit.
- Visually inspect the coils. If fins (the thin metal blades) are clogged with lint and dust, use a soft-bristle brush to gently remove buildup. Fins are fragile: aggressive scrubbing bends them and reduces airflow.
- Use your garden hose on low pressure to rinse the coils. Spray from inside the unit outward. High-pressure washers can damage fins and are overkill for routine maintenance.
- Clear any leaves, twigs, or grass clippings around the base and sides. Maintain a 2-foot clearance in all directions.
- Check the refrigerant lines (the copper tubes entering and exiting the unit) for visible damage, cracks, or leaks. You’ll see oil residue if there’s a leak: contact a professional if you spot any.
- Restore power once the unit is dry.
If fins are badly bent, a fin comb straightens them without damage. These tools cost $10–20 and pay for themselves by restoring efficiency. If your condenser is more than 10 years old and fins are severely corroded, professional replacement may be more cost-effective than repeated repairs.
DIY Inspection Checklist For Homeowners
Beyond filters and condenser cleaning, a few other checks help you stay ahead of problems. You don’t need special tools for most of these, and spending 20 minutes twice a year catches issues early.
Indoor inspection:
- Listen for unusual sounds: squealing suggests worn blower bearings: grinding points to fan blade damage. Note when sounds occur (startup, shutdown, constant) and mention this to a technician.
- Feel airflow at supply vents in several rooms. Weak flow in one room might indicate a blocked duct or damper: weak flow everywhere suggests a filter issue or blower problem.
- Check the thermostat display for error codes. Modern units show codes if refrigerant pressure drops or sensors fail. Note codes and take photos for reference if you call for service.
- Inspect the condensate drain pan under your indoor unit. It should be clean and water flowing freely into the drain line. Algae or standing water blocks drainage and causes water damage: flush it with white vinegar mixed in water, or call a pro if buildup is thick.
Outdoor inspection:
- Check refrigerant line insulation. If foam wrap is cracked, peeling, or missing, wrap it with self-adhesive foam insulation tape (inexpensive and available at any hardware store). This prevents energy loss.
- Look for visible refrigerant leaks around connections. A small amount of oil residue is normal: significant pooling or hissing sounds mean a leak. Don’t add refrigerant yourself, leaks must be found and sealed first by a technician.
- Verify the outdoor unit is level. Slight settling over years can stress internal components. A bubble level ($5) takes seconds to check.
Documenting these inspections in a simple spreadsheet (date, observations, filter size, serial number) helps you spot patterns. If you’re replacing the system someday, this history proves maintenance and supports warranty claims.
When To Call A Professional HVAC Technician
Some issues require licensed technicians. Refrigerant work, electrical diagnostics, compressor replacement, and heat exchanger repairs are beyond DIY scope and often violate warranty terms if you attempt them.
Red flags that demand professional service:
- No cooling or heating. A thermostat adjustment might help, but if resetting your thermostat or replacing the filter doesn’t restore function, a technician must diagnose the cause.
- Refrigerant leaks. Hissing, bubbling, or oily residue on lines means refrigerant is escaping. You cannot legally purchase and add refrigerant without EPA certification.
- Strange smells. Burning plastic or musty odors indicate potential fire risk, mold in ducts, or component failure. Don’t ignore these.
- High electricity bills. A 20–30% spike without explanation often signals reduced efficiency or a compressor near failure. Professional testing identifies the source.
- System age over 15 years. Even if running, older units become expensive to repair and less efficient. A technician can advise whether repair or replacement makes economic sense.
When you call, provide your system’s model and serial number (usually on a sticker on the outdoor unit or indoor handler), a description of symptoms, and when they started. This speeds diagnosis and often reduces the service call fee. Check references and verify licensing before hiring. In Texas, HVAC technicians must hold an EPA Section 608 Certification for refrigerant handling: ask to see it. Resources like top-rated HVAC contractors in Weatherford can help you find qualified companies. Comparing quotes across multiple contractors ensures fair pricing, expect service calls to range $75–150, with repair estimates varying widely based on the problem.
If you’re building a new home or expanding your HVAC system, professional sizing and installation are non-negotiable. Undersized units run constantly and fail early: oversized ones cycle inefficiently and waste energy. A technician calculates load requirements based on square footage, insulation, windows, and climate. Platforms like HomeAdvisor also connect you with vetted local contractors and provide cost estimates specific to your area and project scope.
Conclusion
HVAC maintenance in Weatherford doesn’t demand special expertise or expensive tools. Replacing filters, cleaning outdoor coils, and running a quick inspection twice yearly keeps your system efficient and reliable. Catch problems early, invest in professional service when needed, and you’ll enjoy steady comfort and lower energy bills. Your neighbors might see their systems fail in peak summer heat, you’ll stay cool knowing yours is ready.